


Guide: How to Fix Common Problems with Car Window Tint Film
Here you’ll find the most common issues that can occur when installing non-adhesive window tint film on a car – and how to fix them the right way.
- Blurred vision - the window tint is blurry or foggy
- Edge lifting – the film releases along the edges
- White spots – small white dots appear in the film
- Bubbles – bubbles between glass and film
- Detachment – the film loosens partially or completely
If you previously had a traditional adhesive tint installed, it must be removed before you apply new film. Read our guide: how to remove stuck window tint from car windows .
Blurred vision: the window tint is blurry or foggy
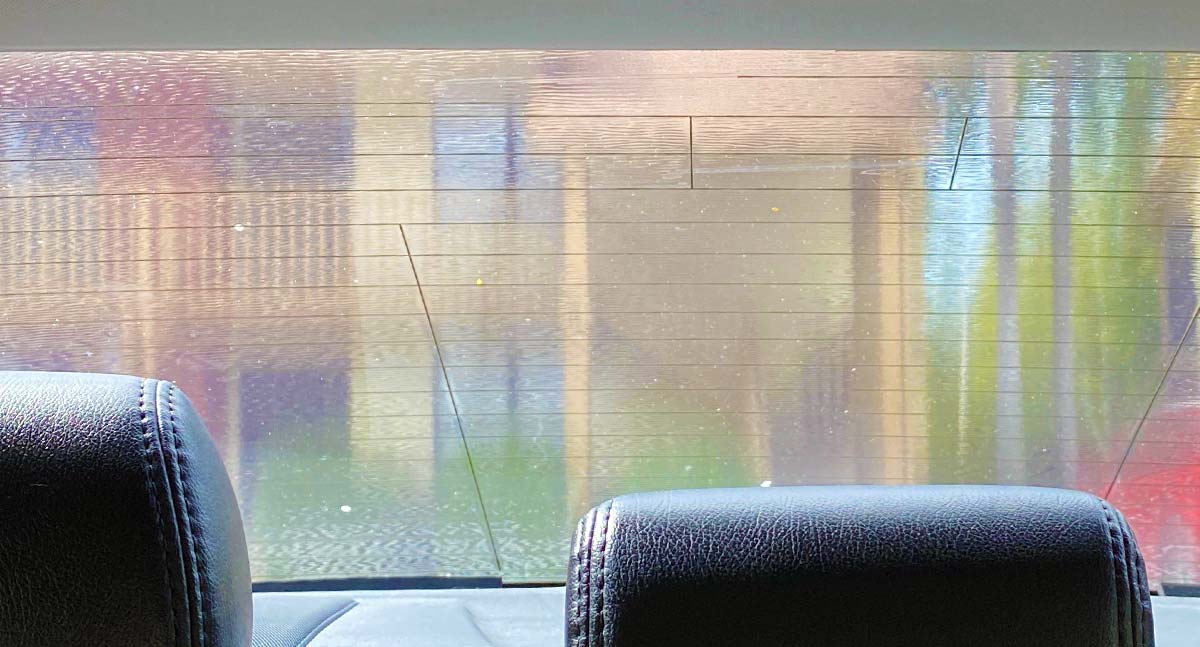
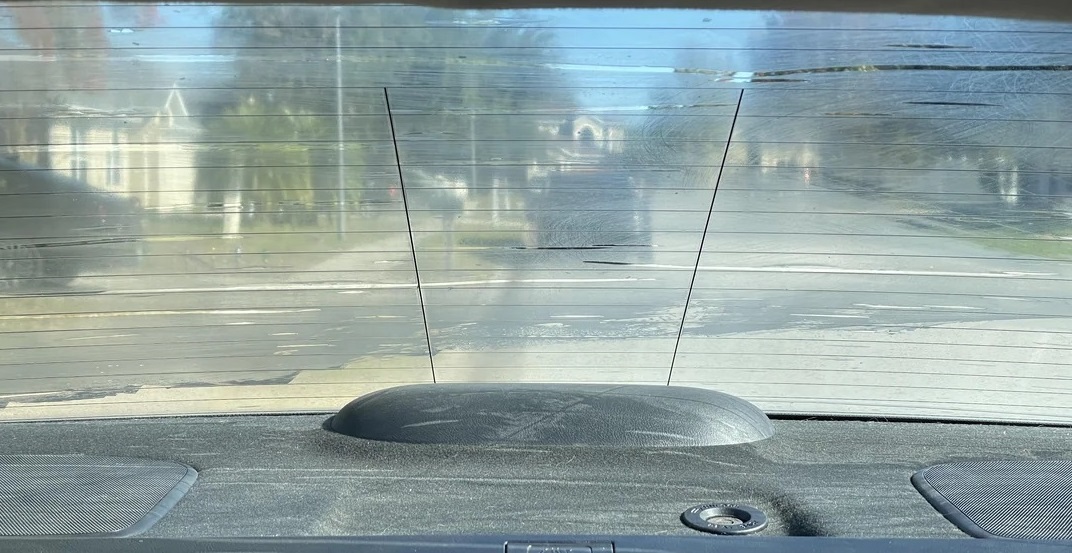
It is not uncommon to experience blurry or foggy windows after tinting your car. Understanding the primary causes of blurry or hazy car windows after installation can help you manage your expectations during the drying process.
Possible Causes
- Liquid left between the film and the glass. The most common cause of fogging. During installation, a squeegee is used to remove excess liquid between the solar film and the glass. However, some liquid may remain whether you want it to or not, which can cause a cloudiness or hazy appearance. This is especially true when installing window film during cold months.
- Oil film on the glass. If the glass has been cleaned with a cleaner that contains oil, e.g. soap or the like, a film of oil can form on the glass, causing haze.
- Ammonia in the cleaning agent. If the glass has been cleaned with a cleaning agent that contains ammonia, the remaining residue can migrate into the film, which slowly destroys and becomes blurry.
How to fix the problem
- In the first case, there is no need to panic as it usually resolves itself as it dries and visibility becomes clear. The time it takes for the tint to dry depends entirely on the installer's care during installation and the amount of sunlight and heat the car receives. It usually takes between 3 days and 4 weeks for the film to dry, with cloudy or colder conditions extending the process.
- In the second case, there is no other solution than to remove the film, clean the glass and the film with ammonia-free window cleaner, alcohol (glass) or similar cleaner that does not contain either oil or ammonia, and redo the installation (if possible).
- Unfortunately, there is no way back. The film is ruined and new film is needed to achieve a satisfactory result.
Please note: This is an installation-related issue and is not covered by warranty. New film can be purchased at a reduced price via our after-purchase guarantee .
Edge lifting: the window tint film lifts along the edges


When the film lifts at the edges, it often creates a wave pattern (“shark teeth”). This is one of the most common issues with non-adhesive window tint film.
Possible causes
- Insufficient cleaning. The glass must be completely clean – especially the edges. Oil, grease or dirt prevents the film from bonding properly during drying.
- Too little / incorrect squeegeeing. During squeegeeing, liquid is pushed toward the edges. If it is not fully removed and dried, it can flow back under the edge later – and the film may lift.
As long as the film is still soft and flexible, reinstalling is often possible. If the film has been exposed to strong heat and is visibly deformed, it usually cannot be saved.
How to fix it
- Carefully lift the affected edge a few centimeters.
- Clean both the glass edge and the film edge thoroughly.
- Apply a thin layer of EVOGEL to the glass.
- Spray both film and glass with installation liquid.
- Reposition the film and squeegee carefully – dry the edges thoroughly.
- Let dry completely: in summer usually 3–5 days (depending on weather/wind), longer in colder seasons.
Note: This issue is caused by installation error and is therefore not covered by warranty. If you need replacement film, you can purchase it at a reduced price via our additional purchase guarantee .
White spots: small white dots visible in the film


White dots that appear after some time can be caused by steam marks, frost marks, limescale residue or dust.
Possible causes
- Steam marks: Small liquid residues evaporate in heat and leave dot-like traces.
- Frost marks: Small liquid residues freeze in cold conditions and become visible as white dots.
- Dust particles: Micro-dust (often barely visible) gets trapped between glass and film during installation.
- Limescale: Hard tap water can leave mineral residue during drying.
How to fix it
- Steam marks: Wait 2–3 days first. If they remain: remove and reinstall; let the car dry cool/in shade.
- Frost marks: Move the car to a warm garage (or gently warm the glass), remove and reinstall, let dry warm.
- Dust particles: Remove the film, clean the glass very thoroughly and rinse the film in lukewarm water, then reinstall.
- Limescale: Reinstall – ideally using distilled water in the installation liquid.
Note: This issue is almost always related to installation/environment and is not covered by warranty. Replacement film is available at a reduced price via the additional purchase guarantee .
Bubbles: the film has bubbles


If prep work or squeegeeing was rushed, bubbles can appear after a few days. This can often be fixed.
Possible causes
- Too little squeegeeing: Installation liquid remains between glass and film. In heat it expands → bubbles.
- Poor cleaning: Dirt/grease/oil prevents bonding – the film “moves” with heat and forms bubbles.
How to fix it
- Push the bubble out (if near the edge): Mix 0.5 L lukewarm water + 1 tsp dish soap (improves glide). Spray well and squeegee the bubble toward the edge. Dry the edges afterwards.
- Partial lift: If the bubble sits between the edge and the center, carefully lift the film up to the bubble, remove air/liquid, then reapply and squeegee.
Many bubbles in several areas? Then a full re-install is usually needed:
- Lift one corner and slowly peel off diagonally.
- Clean the glass thoroughly (tip: clean the outside first – it makes dirt on the inside easier to spot).
- Reinstall and squeegee much more thoroughly (multiple passes).
- Let dry fully (garage/shade is fine): in summer usually 3–5 days, longer in colder seasons.
Note: Installation issue, not covered by warranty. Replacement film is available at a reduced price via our additional purchase guarantee .
Detachment: the film has (partially/fully) come loose from the window


When installed correctly, EVOFILM sits very firmly – even without adhesive. If the film comes loose over large areas, the instructions were likely not followed, or the squeegeeing step was underestimated.
Possible causes
- Instructions not followed fully. Non-adhesive window tint installs differently than adhesive tint – even professionals should follow each step.
- Incorrect installation liquid. Soapy water can work, but it is error-prone. Too much soap prevents bonding.
- Too little squeegeeing. The liquid is only for positioning. It must be removed almost completely – several passes are often required.
- Direct sun immediately after installation. High heat right after installation can evaporate the remaining liquid too fast, before the film stabilizes. Use garage/shade until fully dry.
Solution
- Read the installation guide carefully and watch the videos.
- Remove and reinstall the film – squeegee thoroughly and dry all edges.
- Allow proper drying: in summer usually 3–5 days, longer in colder seasons; avoid strong heat during this period.
Note: Installation issue, not covered by warranty. Replacement film is available at a reduced price via our additional purchase guarantee .